Secure remote access
While it's normally perfectly fine to use the built-in web server of the Opentherm Monitor application from within the private network in your house, if you want to allow outside access, some protection must be put in place. Without it, anyone would be able to observe and change your heating. There are several different methods available.
Simple password authentication
 By default the standard web server port is open to anyone who can access the
port on the machine with a web browser. Since the machine will normally be
on a private network, that should only be people you know and trust. If for
some reason you allow people on your network that you don't want to be able
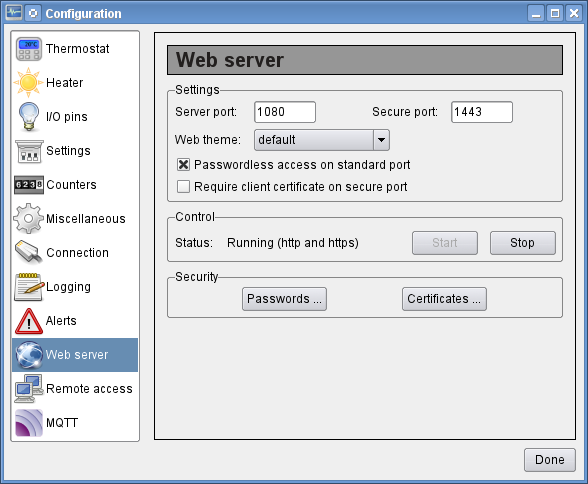
to access your central heating information, you can set up users and
passwords using the "Passwords ..." button on the web server configuration
screen. Then switch off the "Passwordless access on standard port" option on
the same configuration screen. Anyone trying to access the Openthemr Monitor
web pages will now have to enter a username and password. Web browsers will
normally remember the entered information for the duration of the session,
so a user will only have to enter their credentials once a day.
By default the standard web server port is open to anyone who can access the
port on the machine with a web browser. Since the machine will normally be
on a private network, that should only be people you know and trust. If for
some reason you allow people on your network that you don't want to be able
to access your central heating information, you can set up users and
passwords using the "Passwords ..." button on the web server configuration
screen. Then switch off the "Passwordless access on standard port" option on
the same configuration screen. Anyone trying to access the Openthemr Monitor
web pages will now have to enter a username and password. Web browsers will
normally remember the entered information for the duration of the session,
so a user will only have to enter their credentials once a day.
If an unauthorized person has the ability to monitor the network traffic, it
would be trivial for them to obtain the username and password of a legitimate
user accessing the web server. So don't use this method if that is a concern.
Encrypted connection
For access from the internet you should use an encrypted connection. Even if someone can monitor the traffic, they will not be able to understand it. To be able to use an encrypted connection, you need a server certificate that is signed by a so-called Certification Authority (CA). There are official CA's that all browsers know about. A certificate signed by such a CA is silently accepted by the browser. But for this application it's better to create your own CA. That can be done using the "Certificates ..." button on the web server configuration screen.First, select the "Setup certification authority" option, and click "Next". Make up a nice name for the CA and fill in some reasonable information in the other fields. Finally specify a password (or passphrase) for the CA and remember it. Click "Next" to create a CA private key and certificate.
Next, select "Create server certificate" and click "Next". This time it is important to set the Common Name to the IP-address or FQDN you will use to remotely access your server. The tool makes a few suggestions, but you can also enter something completely different. If you have a fixed public IP-address, you can use that. If you use a service like DynDNS, specify your dyndns FQDN here. Fill in the other fields again, specify the CA password, and click "Next" to create a server private key and certificate.
Now specify a secure port on the web server configuration screen and restart the web server by clicking the "Stop" and "Start" buttons. Make sure the status information says "Running (http and https)".
To correctly use the secure connection, you should import the CA root certificate into the browser you will use to access the otmonitor web server. The certificate is called CA.crt and can be found in a directory called auth, next to the otmonitor binary. Send this file to the machine that will be used for remote access and install it as an Authority certificate that can identify websites.
After you have configured your router to send selected traffic to the secure port of the otmonitor web server (see below), you should be able to access the web server using https://<address>:1443/, where <address> is the FQDN or IP-address you specified for the server certificate and 1443 is the port you configured on your router. The web server will require a username and password, so make sure you have those set up as described above.
Client certificates
It is inconvenient to have to enter a username and password every time you want to remotely control your heating. A possible way around that is to use client certificates. A client certificate is signed by the CA, thereby certifying that the user is who he claims to be. This is the reason it is better to make your own CA. You don't want to give some external organization the freedom to hand out certificates that can be used to access your system.Officially, a user should generate his own private key and a certificate signing request (csr) on his own machine. As a convenience this can be done with otmonitor certificate wizard using the "Create signing request" option. If the user generated his own csr file, copy it to the server running otmonitor. If the user's signing request is created on the server itself, the csr file can be found in the auth directory.
To sign the csr, start the Certificate Wizard on the server via the "Certificates ..." button on the web server configuration screen. Then select the "Digitally sign a client's CSR" option and click "Next". On the next screen, specify the location of the csr file and click "Next". The information from the csr will be displayed. Verify it is correct, then enter the CA password and click "Next" to generate the client certificate. The client certificate is created in the auth directory and has a .crt extension. This file should be sent (back) to the user.
The user will have to import the signed certificate into the browser as a user certificate. Most browser want to have the certificate as a PKCS#12 file. If OpenSSL is installed on the system, the otmonitor Certificate Wizard can be used to create a PKCS#12 file from the user's private key and the signed certificate using the "Bundle files in PKCS#12 format". The output of this action is a file with a .pfx extension that will be created in the auth directory.
With the client certificate loaded in the browser, the user should now be able to access the server via https without being asked for a username and password. If you don't want to present intruders with a username and password prompt that they can try guessing at, set the "Require client certificate on secure port" option. Anyone without a client certificate will then just get an "Unauthorized" page.
Revoking certificates
If a device with a client certificate has been lost or stolen, you obviously don't want to grant that certificate access anymore. In such a case a certificate can be revoked via the "Revoke a client certificate" option in the certificate wizard.Router configuration
To be able to access the otmonitor web server from the internet, a port forwarding entry has to be configured on your router. The way to do that depends on the router. In principle you have to create a static NAT binding or port forwarding from an external port to the machine running otmonitor, and the (secure) port you configured on the web server configuration screen. On some routers the external port number has to be equal to the port on the server. But even on more flexible routers it is less confusing to keep them the same. If you have a firewall on your server, you have to open up the port there as well.Configuring security without a GUI
When otmonitor is running as a daemon, there is no GUI available to assist in setting up security. It is still possible to do so with the help of dbus commands. The relevant commands are all under the /Security path.
- com.tclcode.otmonitor.AddUser
- Add a new user.
- com.tclcode.otmonitor.ChangePassword
- Change the password for an existing user.
- com.tclcode.otmonitor.DeleteUser
- Delete a user so they are no longer able to access the system.
- com.tclcode.otmonitor.AddCertificate
- Register a client certificate for use with the web server.
- com.tclcode.otmonitor.RevokeCertificate
- Revoke a certificate when it may no longer be used to access the web server.
- CA.crt
- The certificate authority certificate
- server.key
- The private key for the server. The key should not have a password/passphrase.
- server.crt
- The server certificate signed by the certificate authority that owns the CA.crt certificate.